We’ve simplified a quick list of monthly to-do’s to keep you on track with your home maintenance so that you can get things done, and then with peace of mind, enjoy everything special about the season. June is the start of summer, so tackle these early and enjoy the warm weather!
Test all of your smoke detectors and carbon monoxide detectors.
Seal your deck. You will need 3 consecutive warm, sunny days. Give the deck a full day to get nice and dry. On the second day, scrub and clean it early. On the third day, at least 24hours after cleaning apply the sealer.
Hire a certified chimney sweep. Cleaning and inspecting the chimney now, instead of in the cooler fall months, allows for ample time to complete any necessary repairs. It will also be easier to schedule with them since many people wait until just before the heating season.
Clean your home’s exterior with a mild detergent and a water hose. Pressure washers are great tools, but when it comes to siding, they are so powerful that they can actually force water underneath, encouraging the growth of mold and mildew.
Clean your dryer vent system. This is a key task for fire safety. Lint is extremely flammable. Open up the back of the dryer and clean in there too. If you’re looking for a professional to do it, ask your local duct cleaners.
Make sure that your motion detector lighting systems and automatic timers are all set and working properly. Those automatic timers are particularly important if you plan to be away on vacation.
Welcome, May! So good to see you! As you work your way through this month’s checklist, think Memorial Day, beach weather, the smell of fresh-cut grass, longer days, and warmer nights!
Test all of your smoke detectors and carbon monoxide detectors.
Clean and inspect your gutters. Make sure the clips and straps are all tightly fastened. Run a garden hose in them and make sure the water is directed at least 3 feet away from your foundation.
Don’t let the beauty of spring and sunshine be clouded; make those windows sparkle! Streak free tip: don’t work directly in the sun.
Air-conditioning season approaches. Have your unit checked, clean the condenser or heat pump of debris, and replace the forced-air filter.
Reset your thermostats and automatic sprinklers as the weather changes.
Paint your patio and deck furniture to enjoy it all season long. If there’s no need to paint, coat metal pieces with auto polish before placing them outside for the season.
Put away your winter clothes. Have articles you didn’t wear even once this year? Donate them and don’t forget to keep track of your donations for taxes next year.
For a beautiful, bountiful summer, start your preparations in April! Run through our maintenance checklist, then start a list of your own of all of the things you’d like to accomplish next season.
Test all of your smoke detectors and carbon monoxide detectors.
Clean your window screens with a bristle brush, a mild detergent and a garden hose.
Check for sales on winter maintenance equipment like snow shovels, generators, snow blowers, etc.
Prepare your winter equipment for storage and your gas powered lawn equipment for use.
Inspect your home’s exterior for signs of rot. Use a small awl to probe for any soft spots on railings, window sills, and posts.
Prepare to Grill! Grills can be cleaned with soapy water and a brass bristle brush. You may need to also clean the gas hose, and don’t forget about the drip tray. See your manufacturer’s instructions.
Re-caulk open joints around windows and doors, and replace weather stripping where worn.
Clean your range hood and either clean or replace the filter.
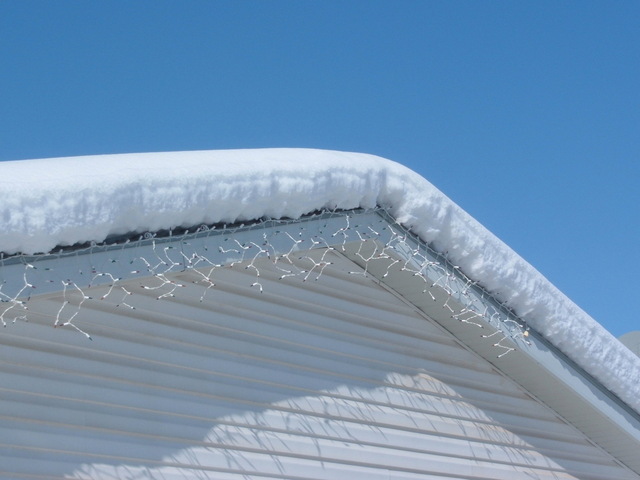
It’s still winter and we have the snowy forecasts to prove it. Snow and fluctuating temperatures create the recipe for ice dam formation. What exactly is it that causes them? Well, if there is snow on your roof and you have a “heat leak” (a spot where there’s not enough insulation and the heat from the house is escaping), the heat will actually start to melt the snow around it. The water will run down the roof, but with the low temperatures it will then refreeze forming an ice dam. The more snow that melts, the more water that runs, the bigger the dam gets. Once the temperatures rise and all of the snow starts to melt, water will back up behind the dam and can leak into your home underneath your roof shingles. We still have plenty of winter left to add to this potential recipe for disaster, but you can avoid the costly damage that can become of this mix by monitoring two simple things. Ice dam formation and clear drainage paths.
You’ve probably heard about ice dams in the news, especially in winter of 2015, but like many other common property dangers you may not be aware of the actual danger they may pose to your home. Reconsider the “it won’t happen to me” idea and do the following to protect your investment.
Make sure your gutters and downspouts are clear of ice and debris. Regardless of the formation of ice dams or not, the snow is eventually going to melt and the water will have to be directed away from the house. If you’re already following our monthly maintenance to do lists, you’ve already made sure that the spouts are directing water at least 3′ away from your foundation.
Clear your roof of the snow and ice. You probably don’t even know that you have a heat leak in your roof until you see the ice dam form. You’ll have to address the insulation later, but first things first, remove the dam that has already formed. Although the safest option is to hire a snow removal professional, you can (carefully) remove it yourself by using a roof rake, not a shovel, to push the snow off without damaging your shingles. Don’t stand underneath where any icicles or dams may fall, avoid contact with your electrical wires, and make sure someone else is around just in case you need some help.
Melt a channel to direct the water. Another option for existing dams is to create drainage paths in the ice for when they start to melt. Fill a large sock with a melting agent such as calcium chloride and place it directly on the dam perpendicular to your gutter. The purpose of the sock is to control the release of the melting agent, and by laying the sock perpendicular to the gutter you’ll create a channel in the ice for the water to eventually drain through. If the dam runs the length of your roof, you’ll want to put several socks up there.
What if the ice dam and snow build up has already started a leak inside the house?
Mop up the standing water.
Put a bucket under the drip to collect any additional water.
Move your stuff away from the area to prevent it from also getting wet.
Call a professional to deal with the snow and ice dam.
Call a water mitigation professional to deal with the interior damage and drying. Even a small leak can make it’s way through several layers of your home, and everything will need to be completely dried to avoid mold growth.
Call your insurance agent or your insurance company to see if the damage will be covered under your policy. Find out what you’ll owe out of pocket for your deductible.
So, if you notice an ice dam forming on your roof, remove the snow and ice as soon as safely possible. If you can’t rake the dam off, create a channel for the water run trough it with a controlled melting agent. Take a picture and note where the dam formed, then address the insulation in that area to make sure it doesn’t form again.
Questions or concerns about any of these details and tips? Send us an e-mail! We’d love to hear from you!